Wood flooring installation
Our wooden flooring is simple to lay and uses a traditional tongue-and-groove installation system. It can be fitted in almost any room or commercial space except for a bathroom, wetroom, or other areas where there is a regular flow of water. If you are looking for an experienced fitter, we can help – just email us your postcode. We have a list of fitters recommended by our customers and who we have found to be reliable – though please note, these are independent tradespeople and as such we cannot take responsibility for their work or any arrangement you make with them.
Below are guidelines for both floating and gluedown installation. While every endeavour has been made to ensure the information given here is true and reliable, it is given only for guidance. The company cannot accept any responsibility for loss or damage that may result from use of this information, due to the possibility of variations of processing or working conditions and/or workmanship beyond our control. Users are advised to conduct their own tests for a particular application.
These guidelines are intended to be followed alongside the British Standard BS8201 or the appropriate standards in the country of installation. Installers must ensure that all electrical equipment used is suitably tested and labelled and that the relevant safety procedures are followed at all times.
SUITABILITY
Our wooden flooring can be installed in most domestic and commercial areas, though we don't recommend them for use in bathrooms as excessive moisture can cause issues with dimensional stability. These floors are suitable for indoor use only. Check if the subfloor and site conditions are in accordance with the specifications described within these instructions.
GLUEDOWN OR FLOATING?
You can install our wooden plank flooring (except parquet which must be glued) as either a gluedown or a floating installation and each method has its advantages.
Gluedown involves sticking your planks directly to the subfloor. In a floating installation, the planks are glued to each other, but not to the subfloor, instead your floor is held in place by its own weight.
Generally, gluedown is the best, most stable option but it is also more expensive and time-consuming to install and harder to uplift if you need to deal with a problem such as a leak.
The advantages of gluedown are a firmer feel underfoot and a quieter surface - less chance of creaking or a “drum effect” when walking. Gluedown floors are also more forgiving of slight uneven-ness in the subfloor and they can be sanded far more easily if necessary.
Floating floors are quicker and cheaper to install with less drying time required, and can be a simpler option if you want to try your hand at a DIY install.
Because the planks are not fixed to the subfloor, there can be a slight bounce to your floor in certain parts of the room. It is possible, for example, when you walk past a piece of furniture, you might see it move slightly due to the movement of the flooring under your weight. This is much less likely with a gluedown floor. That said, floating installation is very common and chances are, you’ll hardly notice the movement or noise….the choice is yours!
Please note, if you are fitting over underfloor heating or in an L-shaped hallway, it needs to be glued down for stability (see underfloor heating section).
SUBFLOORS
Subfloor preparation
Our wooden floors can be laid on to concrete, ceramic tiles, marble, OSB or plywood.
For a successful install, you need the right subfloor. The surface beneath your wooden floor must be structurally sound, free from damp, rot, fungus and pests. It needs to be clean, with no dust, grease, wax, paint and any other dirt, stains or contaminants.
Make sure the subfloor on to which your floor is being laid is smooth, flat and rigid with uneven areas not exceeding 2mm over a 2m area. If your subfloor is uneven we recommend you use a good-quality self-levelling compound approved for use with engineered wooden flooring (eg Mapei Ultraplan), carefully following the manufacturer’s instructions, including priming where required.
It is vital that your subfloor and the base of your walls are completely dry. Even a subfloor that looks dry may contain excess moisture, so testing is important. If you are laying on a concrete floor, the moisture level should not exceed 65%RH when tested with a hygrometer, or 10% Wood Moisture Equivalent (WME) for wooden subfloors.
Please bear in mind that if you are laying on new concrete it can take up to 6 months to dry out completely, and that plaster can take 6 weeks to dry and paint 10 days.
Your new flooring must not be exposed to artificial heat sources such as from heated pipes at shallow depth below screeds, or suspended pipes below floorboards. Pipes must be thoroughly insulated.
Your subfloor must have suitable compressive strength. Concrete screeds tested by a sclerometer should have a value of at least 15H/mm2. Concrete strength can be checked with a nail. If it doesn’t crumble when scratched, the screed is sufficiently firm. Low density boards such as extruded insulation panels should be over-boarded with a higher density material prior to installation.
Wooden subfloors
To lay on an existing wooden floor, ensure that all existing planks are dry and free of any movement. The moisture content for wooden subfloors or joists should not exceed 10% and the moisture content difference between the timber substrate and your wooden flooring planks should be no more than 3%.
Cover the floor area with flooring grade plywood with a minimum thickness of 15mm (P5 flooring grade particleboard and dry screed panels can also be used). Panels should be acclimatised to the site conditions before fixing as recommended by the supplier. Boards should be fitted at right angles to existing planks, firmly fixed at 300mm centres and finished flush with the surface. Sand down any high spots and fill low spots with suitable self-levelling compound. If the subfloor is formed by wooden boards with open joints, these must be sealed with a sealer approved for use with engineered wooden flooring.
Gluedown subfloor preparation
For gluedown, the surface needs to be rough enough to provide a key for the adhesive, so slick or sealed surfaces may need pre-sanding. Gypsum and anhydrite screeds will need surface laitance removing.
Your flooring cannot be glued on to any expansion joints, as if it is fixed firmly in place it cannot “work” with the movement of the building. Use suitable expansion strips in such areas.
Glue down flooring using our recommended adhesive carefully following the manufacturer's instructions.
TRANSPORT, STORAGE, ACCLIMATISATION AND ENVIRONMENTAL CONDITIONS
Before delivery or fitting of your floor, wet trades, including painting, plastering and screeds should be completed and dried, and doors and windows must be watertight.
Always transport and store the flooring cartons horizontally. These should be acclimatised in their original, unopened packaging, in the room where they are to be fitted for 4-5 days. Do not remove until just before installation. Store the wood in the middle of the room, away from direct sunlight as well as from walls and radiators and fully supported on wooden battens to avoid heat building up on the bottom boards.
The flooring and the room where it is being fitted should be acclimatised in conditions as close as possible to normal living conditions, so heating or air conditioning should be switched on for at least two weeks before laying. Underfloor heating needs to be switched off at least 48 hours before fitting.
During storage and installation, and for the life of the flooring, maintain temperature at a constant level between 18ºC to 22ºC (65ºF to 72ºF) and relative humidity in a range from 45 to 65%.
Some general tips on environmental condition:
Low humidity will cause wood to shrink, high humidity will cause it to expand. Low humidity is generally caused by overheating a room. High humidity by poor ventilation. Gas heaters can also cause high humidity.
Introducing plants that are watered regularly or open containers of water to a room may increase humidity, airing a room can lower it. A humidifier/dehumidifier can also be useful. It is especially important to monitor rooms that may remain unheated for long periods, where humidity may build up.
All wood expands and contracts as a result of changes in temperature and humidity, which is why expansion gaps are needed when you are fitting it.
UNDERLAY
Underlay for floating installation
An underlay is necessary for all floating floor installations. Different underlays have different acoustic properties and capacity to isolate moisture in the subfloor. You need to ensure that your underlay is suitable for your project. Underlay should be laid at right angles to the direction of the floorboards and should not be overlapped. Joints need to be sealed with a suitable vapour tape.
Please note that a vapour barrier is not the same as a DPM, which may also be necessary if the moisture content of your subfloor or base of your walls is too high (see subfloor section).
Underlay for gluedown installation
For gluedown installation, wooden flooring can be stuck directly to the subfloor, but if you require additional sound-dampening, a suitable double-stuck, high-density underlay can be used.
This must be bonded to the subfloor using our recommended adhesive and allowed to fully dry before your wooden flooring is installed. Please note that such an underlay does not constitute a vapour barrier or DPM. These need to be installed prior to the underlay where required.
UNDERFLOOR HEATING
If you are fitting your flooring over underfloor heating (UFH), it should be glued down for stability. We recommend using either a water pipe UFH system set into screed or an electric system set into a reinforced smoothing compound. This needs to be thoroughly dry before your flooring is delivered or installed. There should be sufficient coverage over the cables (check your UFH supplier’s recommendations). No pipe or cable should be in direct contact with flooring or underlay and where necessary distribution board should be fitted to ensure even heat and to prevent hotspots.
The surface temperature of the subfloor must not exceed 27°C. Remember that rugs, mats and some furniture placed on top of the floor may act as heat accumulators and increase the floor surface temperature more than the recommended level. Please also note that the temperature registered by wall mounted, free-standing thermostats can be lower than the real temperature at floor level, so you need to adjust accordingly.
For detailed information on UFH installation, follow the instructions supplied by the heating system manufacturer, or contact your supplier. Any heated subfloor has certain installation requirements depending on the system and the subfloor, which need to be followed very strictly.
A heated subfloor has to be dried by turning the heating on/off with a pause before any flooring can be installed, following a documented protocol. The subfloor should be in place and cured for at least 60-90 days.
The beginning of the heating phase in concrete subfloors must not begin until 21 days after complete curing of the substrate. The temperature should then be increased each day until the maximum temperature allowed according to the manufacturer's system. This maximum value should be maintained for 5-7 days without turning off. Temperature should then be decreased gradually to the off position. We recommend carrying out at least two cycles to ensure all moisture is released. Switch off for 4 days before taking moisture readings.
Underfloor heating should be turned off at least 48 hours before fitting your floor and alternative heat sources should be used if necessary to ensure a stable temperature between 18ºC to 22ºC during installation and for at least 48 hours afterwards, including overnight. Humidity must also remain constant in a range from 45% to 65%. This is a crucial period to ensure dimensional stability in your flooring.
When turning the UFH back on, increase the temperature by no more than 2ºC for each 24-hour period until room temperature is achieved.
You should use the same rule anytime the UFH has been turned off for a period. A similar cool-down timetable should also be used (2ºC for each 24-hour period) when turning your UFH off. Maintain a UFH frost temperature of at least 12 ºC when it is not in full use.
EXPANSION GAPS
As a natural material all wood expands and contracts with changes in temperature and humidity. It is therefore vital to provide expansion gaps where your flooring meets the walls or other fixed objects. Door frames and architraves can be undercut to allow the flooring to fit underneath while keeping the appropriate expansion gap. Transitions between two rooms and asymmetrical floor areas will also require extra expansion gaps. Use spacers when fitting and leave a 2mm gap for every metre of floor with minimum gap of 10-15mm. After installing your floor, these gaps can then be covered by the skirting or suitable scotia or beading, which should not press down or restrict the movement of the floor. You should install threshold profiles in doorways or other narrow areas which lead from one room section to the next.
INSPECTION AND PREPARATION
Prior to installation, please inspect the planks in daylight for any visible faults or damage and to ensure they are the design you were expecting, as we can't take items back once they have been used or fitted. Our wooden floors are natural products and each plank has its own shade and pattern. Shuffle the planks before laying to achieve an attractive blend of shades. Ideally planks should be laid following the direction of the main light source; we recommend flooring should be laid crossways to any existing floorboards
GLUEDOWN INSTALLATION
Measure the room accurately, at a right-angle to the direction of the planks. You need to ensure that the planks in the final row are at least 6cm wide, so if necessary, the planks in the first row can be trimmed to a narrower width to ensure the final row is wide enough.
Choose the longest wall, or a wall which is likely to be square and straight, to begin your installation
Dry lay the first two rows. The joins between boards should not match up with those in the adjacent row, they should be staggered by at least 400mm.
Use the remainder of the last board in the first row to start the second row, but if it is less than 300mm, start with a new board.
If your wall is uneven, you may have to cut planks to match the wall-angle. Do not forget to allow for the expansion gap.
Once you’ve dry laid the first two rows, mark gluelines on the subfloor, remove the boards ready to spread the recommended adhesive in this glue zone. If required, you can also mark a series of further glue lines running parallel to the starting wall to help you manage the gluing process and drying time more accurately.
It’s a good idea to protect your new floor surface during installation with paper or cardboard taped to the boards. Don’t use plastic sheeting which may trap moisture and cause damage.
Applying the adhesive
It is important to refer to recommendations by the adhesive manufacturer for information about proper trowels, spread rates, drying time and application specifications. Your glue should be at room temperature and well mixed.
Only apply adhesive to surfaces that can be reasonably laid in 30 minutes, to avoid it drying up. Room temperature and relative humidity variations may slow down or speed up drying time.
Starting with one of the longest planks, tongue side facing away from the wall, begin gluing down the first two rows of your flooring, pushing into place and at the same time pressing into the adhesive. You need to make sure there is a full bond between each plank and the subfloor. Be very careful with the alignment of these starter rows, as they are the key to a successful install. While you are gluing out, secure a straight edge along the chalk line to act as a guide and to prevent planks from shifting.
Take care that planks are properly fitted together but never strike a rubber mallet or hammer directly on the flooring to fit the planks, as this can damage the flooring.
Once the first two rows are straight and secure, put your spacers in the expansion gap, spread adhesive 60cm-90cm wide and continue gluing out the following rows.
After every 5 or 6 rows, use tension straps to secure rows together and to avoid unwanted movement.
During installation, clean up any adhesive spilt on the surface of the wooden flooring
FLOATING INSTALLATION
Your floating floor will need an underlay and this will usually require a built-in vapour barrier (see underlays above).
Measure the room accurately, at a right angle to the direction of the planks. You need to ensure that the planks in the final row are at least 6cm wide, so if necessary, the planks in the first row can be trimmed to a narrower width to ensure the final row is wide enough.
Choose the longest wall, or a wall which is likely to be square and straight, and begin your installation, allowing for the required expansion gap (see above). Start with one of the longest planks, tongue side facing away from the wall. Be very careful with the alignment of these starter rows, as they are the key to a successful install.
The joins between boards should not match up with those in the adjacent row, they should be staggered by at least 400mm.
Use the remainder of the last board in the first row to start the second row, but if it is less than 300mm, start with a new board.
If your wall is uneven, you may have to cut planks to match the wall-angle. Do not forget to allow for the expansion gap.
Use a D3 grade moisture resistance PVAC adhesive in all the joints to fix boards together. Apply evenly with a continuous bead, along the top of the grooved joint. Tongue of the next board should be firmly pressed in to the groove to ensure a tight fit. Use a wooden block if needed to assist. For extra strength apply adhesive evenly to both top and bottom of the groove but not into the base of the of the groove as this may prevent the tongue and groove joints from closing. Never spot glue as this can cause weakness and gapping.
We recommend using clamps across the boards to ensure a tight fit, otherwise the wet adhesive may push boards slightly apart.
HERRINGBONE INSTALLATION
Our bevel edged engineered parquet planks do not require sanding and filling like traditional solid parquet blocks. Once the sub floor has been correctly prepared and is fully level, dry and primed (see guidelines above), they can be installed using the recommended adhesive. Our engineered parquet herringbone floors must be installed fully bonded to the subfloor.
Our parquet can be installed in many different patterns as the blocks are universal (not left and right) - they have one tongue and 3 grooves. Please note that some patterns will require false tongues to ensure a stable installation. (For Herringbone styles where the blocks overlap side and header joints, false tongues are not required.)
Step 1 – Prepare For the Installation
Ensure the site conditions and subfloor are prepared and the flooring has been fully acclimatised as per the guidelines above.
Step 2 – Setting The First Row
It is important to be precise with a herringbone installation so ensuring the first row is correctly positioned and square is key. The following method makes layout simple using a perfect square template to set the first row. Ensure the square template is screwed to the subfloor so it can be easily removed once the first row is set. Once correctly positioned the square template will give a solid start point making it easier to move the blocks into position without gaps opening up.
- Plan the direction of the herringbone pattern, usually this will follow the length of the room.
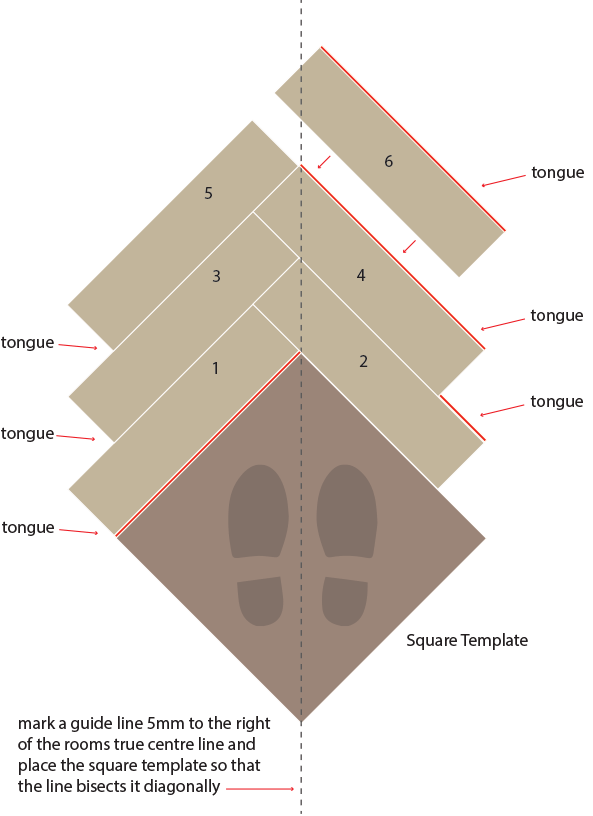
- Find the centre of the room and use a plumb line to mark out a centre line. The apex of the first row of blocks will run along this line. Note: If the centre line is used to align the square template then the row apex will be offset by the depth of the tongue which is approximately 5 mm. If total accuracy is required then first find the room’s centre line and then mark an offset guide line 5 mm to it’s right and use this line to place the square template. The template should have sides equal to, or greater than the length of the blocks.
- Starting close to the wall place the square template so that the offset guide line bisects square diagonally from opposite angles. Once positioned screw the template to the subfloor.
- Working from this template will ensure the first row’s apex follows the centre line.
- Standing on or behind the square template, apply adhesive to the area in front of the square. Note: It is good practise to loose lay the first row to make sure you are happy with the orientation guide line and placement of the square template. Tip: It is also important to mix the blocks to ensure an even distribution of grade, grain and colour variation across the finished floor
- As per the diagram below, place block 1, with tongue against the left hand side of the square template so that the leading header is in line with the right hand edge of the square template
- Place block 2 with tongue facing away so that the grooved edge is pressed against both the header joint of block 1 and the righthand side of the square template.
- Repeat points 6 & 7 placing blocks onto the bed of adhesive ensuring that they connect, the leading corner of the herringbone pattern should be positioned over the centre line which is 5 mm left of the guide line. Tip: Use a hammer and tapping block to push the blocks together, occasionally lift a block and check the adhesive has full coverage.
- Once the first row has reached the opposite end of the room or the finish point, use a tapping block and hammer to make any adjustments while the adhesive is still wet and remove any adhesive which has not been covered. Important Tip: Remove any adhesive spills from the face of the blocks while it is wet with a damp cloth before the adhesive sets. Allow the adhesive to fully cure and this row will form a fixed point template for subsequent rows.
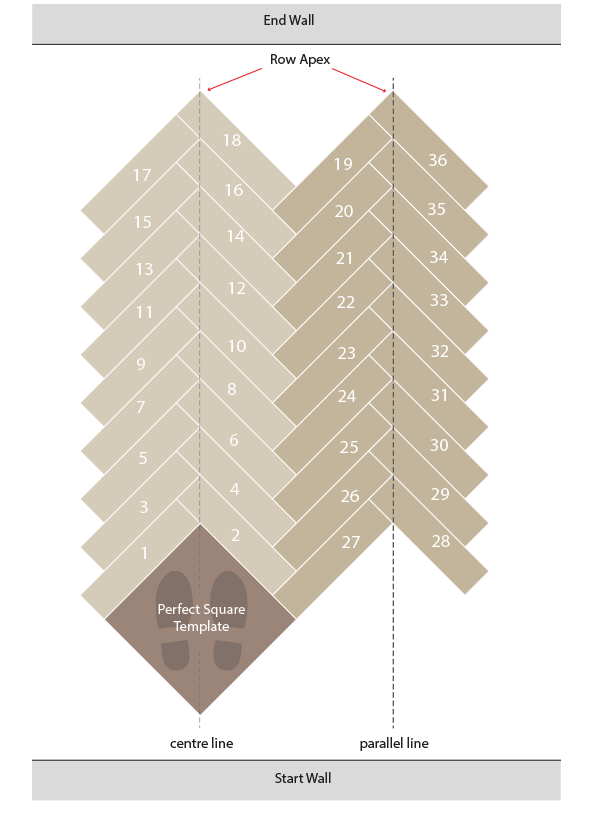
Step 3 – Complete the Installation (refer to the diagram below)
- Working off the first row, loose lay the second row placing checking that that the apex of the second row is parallel to the centre line.
- Once you are happy to install, apply adhesive to the area adjacent to the first row.
- Starting at the ‘End Wall’, install the first half of the second row in two halves. The first block(19) should be placed so that the long grooved edge is pressed against the header joint from the last block in the first row (18) and the header joint groove connects with the next section of exposed tongue the next block(16) in the first row. Repeat this process with the first half the second row until the square template is reached.
- Once the first half of the second row is in place there is no need to wait for the adhesive to set. The second half of the second row is installed. Beginning at the ‘Start Wall’ place the next block(28) so that the long grooved edge is pressed against the header joint of the last block (27) and the grooved header joint connect with the exposed tongue of the next block(26)
- Repeat this process to fill both sides of the first row cutting blocks to fit the perimeter of the room so that adequate expansion gap is maintained which can then be covered by skirting or moulding.
- A border may be installed using a plunge saw to cut away the blocks to make the required space. A groove can then be machined into the cut edge so that blocks can be joined.
AFTER INSTALLATION
Allow approximately 12 hours drying time before walking on the floor and 24 hours before load-bearing. The adhesive will take 7 days to dry completely. Please note drying times vary according to temperature and humidity.
After 24 hours you can remove spacers and install skirting along the perimeter of the room. Secure it to the wall, but not to the floor. If required, install transition mouldings, stair nosings and reducers. We sell a range of colour-matched profiles. See the 'You May Also Need' section of the relevant product page for options.
After installation is finished, thoroughly vacuum the floor and clean it with our floor cleaner.
For wood floors with a UV oil finish, in areas of high traffic such as kitchens (or in commercial installations) an initial application of renewer oil is recommended to commission the floor, adding extra protection where needed. This will enhance and prolong the the usability of the oiled surface.
Place felt pads under all furniture legs prior to bringing furniture into the room.
Be sure to set aside a few flooring planks for future repairs.
USE OF HEATING AND AIR CONDITIONING
As with almost all wooden flooring, the optimum conditions for your planks after installation are 18ºC to 22ºC (65ºF to 72ºF) and with relative humidity in a range from 45% to 65%. If you are introducing a heating, ventilation or air-conditioning system into the room after installation, it is important to ensure no sudden changes are made to atmospheric conditions. A quick jump in temperature or drop in humidity can stress the flooring and cause surface cracking, gaps between boards, distortion of the wood etc.
For this reason any heating or air-conditioning system needs to be brought into operation slowly to allow the timber to adapt. This requires careful measuring of the environmental conditions and an initial set of the system at the existing temperature of the room. Allow the system to run at this temperature for at least 24 hours before increasing by a maximum of 2ºC per 24 hour period. The humidity should be monitored during this time and maintained within the recommended limits. A certain amount of seasonal gapping is to be expected between boards and is a normal part of the performance of your wooden flooring.
Please note that if your installation and building work is taking place during winter months, temporary heating should be used around the clock to maintain the optimum conditions.